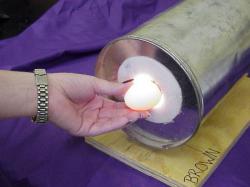
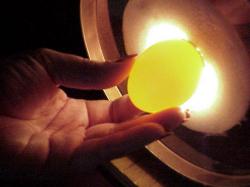
Build Your Own Egg Candler
An important part of an embryology project is letting the students see into the egg. It's quite simple to do. You can purchase a candling unit that can do the job or you can make an inexpensive one yourself. You'll need the following list of supplies:- A tin can. This could be a coffee can or some similar metal can that has a removable top. A large size coffee can works better. try to find one with a bright shiny interior so that the light reflects better.
- A piece of wood to mount the can on. You can use and old scrap piece of 2"x6" board. This will also give the candler a little weight to keep it from getting pushed around as the students push their eggs against it.
- A piece of foam or something similar to put around the hole where the egg touches to pad it a little. Don't use black rubber since the black will come off on the egg!
- A lamp socket. You can either salvage one from an old lamp or purchase one at the store. It should be the type that can screw to the bottom of the coffee can.
- An electrical cord and wire. Either use some off an old lamp or purchase one at the hardware store.
- A switch. A simple on/off switch that costs about 89 cents at a hardware store will do fine.
- A 60 watt light bulb.
- A few small wood screws where required.
Procedure:
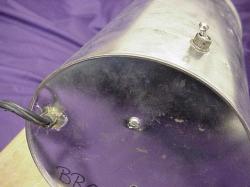
Drill small holes in the bottom of the can so that you can screw the lamp socket to the bottom, in the center. Next, drill a hole in the top and mount the on/off switch where it can easily be reached. Follow the instructions on how to hook up the cord to the light, then wire it in to the on/off switch. Drill a hole in the bottom of the can, near the bottom side and insert the cord with the plug on the end through, then connect it to the on/off switch. Although it is fairly simple to do, don't be afraid to get a knowledgeable person to help you hook up the wires. Install a 60 watt light bulb in the socket.
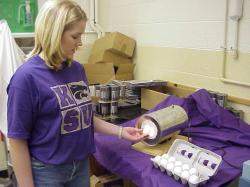
Then, carefully use a scissors or metal cutter to cut a small circle in the lid. The hole should be only big enough for about 90% of the large end of the egg to poke through when held against it. Glue the piece of foam around the hole to serve as a pad. You could also use gray tape, almost anything will do as long as it provides a little padding. If you are using the plastic top off a coffee can, use black spray paint to coat the inside of the top so light won't pass through.
Drill two small holes in the bottom of the can and use wood screws to fasten the can to the piece of wood. If you want, you can place a small block of wood between the can and the larger block to sort of put it on a pedestal. This may make it easy for the students to move their hand around as they hold the egg. A 60 watt build is usually sufficient. It will help if you turn out the lights in the room. If you use a bigger bulb, be sure that your socket and switches are rated for the higher wattage.


Sometimes, you can find old candlers at auctions and garage sales. Some of the antique ones like this one by Sears will work just fine if in good condition.
Find Egg Cartons for Retail Sales
Egg cartons must have the following: Generic nutrition labeling information, place (or farm) where the eggs were packed, a Julian date (the numerical date of the year the eggs were packed), the egg size, and the egg quality. You can purchase cartons that already have the nutrition information, then use a custom stamp for the other information if you are packing them by hand. You can also buy unprinted cartons and print all the information on a sticker and place it on the cartons. This way is a little more flexible since you can make changes.
Locating a source of inexpensive egg cartons isn't easy. And when you do find some, either the minimum order is hundred's of thousands or the shipping charge is enormous. At this time, if you can get generic dozen egg cartons to your doorstep for less than 20 cents each, consider yourself lucky. I know of no local sources in Kansas. If you learn of a good source, let me know. The only ones I know of are listed below:
- This company sells in quantities of 250, by mail: http://www.eggcartons.com.
- The Easy Chicken Poultry and Supply
R.D. 4 Box 464
DuBois, PA 15801
(814)-583-5374
Email: shilala@adelphia.net
The Web Site is located at http://shilala.homestead.com/title.html
Determine the Sex of a Chick
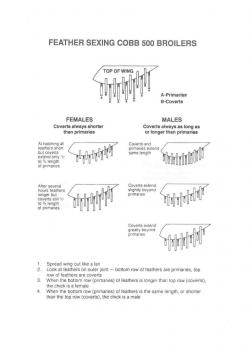
Please note that your chicks must be 'feather sexable', which means they must have a certain genetic trait in order to feather sex them when they hatch (information provided by the Cobb Broiler Manual, Cobb-Vantress, Inc.)
Build a Small Poultry House
Poultry Housing
Housing a small flock of poultry for a farm flock is relatively easy to accomplish. You can convert an old farm building, outbuilding, garage, or other similar structure with relatively few major changes. Alternatively, you can build a new house specifically designed for poultry. A few things to keep in mind are:
1. The needs of the flock for shelter
2. Lighting for the birds
3. Additional electrical source for automatic equipment
4. Your needs for tending the flock
5. And very importantly, if you plan to sell eggs from the farm, make it look nice..............
One of the most important things to remember is: MAKE THE HOUSE AS USER FRIENDLY AS POSSIBLE. User friendly facilities always help minimize the time required to collect eggs and clean out. If you make it difficult to clean out, then guess what - it doesn't get cleaned out as often.
Here's one helpful tip: Use automatic nipple type drinkers if you can. These devices hang from the ceiling and allow the birds to obtain water simply by pushing the valve. It's very simple, reliable for years of service, and sure saves a lot of labor since you don't need to clean them as often. There is no open water source that can get dirty. Chicks can usually find the water easily but if you introduce older birds which have not been trained, you may need to provide some water pans until they find the nipples. You can get them from some poultry supply houses, but they are expensive at $50-75.
Here's another tip: You don't have to build a house that could hold a bull! Remember, chickens aren't going to put a lot a pressure on you fencing so there's no need to over do it. Of course, you may need to consider keeping other creatures out, which could require more substantial fencing and other things like burial of fencing underground to keep tings from digging under.
Make a Free Feed Scoop
Ever needed another feed scoop and there's not one around? Here's a tip to make your own for free. The next time you purchase laundry detergent, keep the container it came in. Most of the new containers are made to hold liquid and are thick walled and strong. Simply cut the screw top and surround piece out and it will make a great scoop after you wash it out.

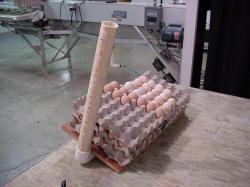
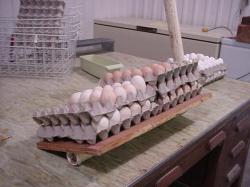
Make an Egg Storage Turner
Everyone knows that eggs need to be turned during the first 18 days of incubation. But did you know that they should be turned while in storage? Some people prop the eggs up on one end using a 2 x 4 board. To turn them, they just slide the board from one end to the other and make the egg stack lean the other way. Here's a helpful device that makes it very easy to turn the eggs. Simply cut a scrap piece of plywood to be about as wide as your stack of eggs that needs to be turned. You can make it as big as the flats you use to store your eggs, or your cartons. Then find some scrap 2" wide PVC pipe, and glue it up using a 2" elbow. Then use bolts to fix the plywood on one side of the L shaped PVC, placing it right in the middle of the board. To turn the eggs, all you have to do is use the upright part of the PVC to lean the eggs in the other direction. Turn them several times a day when you happen to walk by and this should improve hatchability. The pictures will help you build one.

.JPG)